Future Gold
  • Future Gold
  • Future Gold
    • FGT Decentralized
    • Financial Inclusion
    • FGT Ecosystem
    • FGT Blockchain
    • How the Blockchain Works
  • BLOCKCHAIN STRUCTURE
    • FGT Algorithm
    • FGT Platform Structure
    • FGT Cloud Mining
    • FGT Digital Wallet
    • FGT Token Digital Wallet
    • Marketing Strategy
    • Marketing Team
  • AI Arbitrage Trade System
    • 1. Market Introduction
      • 1.1. The Origins
      • 1.2. Current Metrics
      • 1.3. Performance
      • 1.4. Projections
      • 1.5. Regulation
      • 1.7. Liquidity
      • 1.8 Volatility
      • 1.9 Spread
    • 2. Problem Description
    • 3. Arbitrage Trading
    • 4. Product Solution
      • 4.1. Future Gold Arbitrage Platform
      • 4.2. Beta Phase: Arbitrage Pairs Trading
      • 4.3. Stage 1: Arbitrage Pairs Trading
      • 4.4. Stage 2: Simultaneous
      • 4.5. Stage 3: Arbitrage Chain Trading
      • 4.6. Stage 4: Fully Decentralized
    • 5. Technical Details
      • 5.1. Blockchain
        • 5.1.1. Proof-of-Stake Consensus Mechanism
        • 5.1.2. Fully Decentralized
        • 5.1.3. Fastest Transaction Speeds in the Industry
        • 5.1.4. Low Transaction Costs
        • 5.1.5. Differences between Bitcoin and Future Gold
        • 5.1.6. Future Gold wallet
        • 5.1.7. Staking
        • 5.1.8. Staking Rewards
        • 5.1.9. Future Gold Blocks
      • 5.2. APIs of Cryptocurrency Exchanges
        • 5.2.1. APIs in General
        • 5.2.2. APIs in the World Wide Web
        • 5.2.3. APIs of Cryptocurrency Exchanges
        • 5.2.4. API Response Normalization
      • 5.3 Latency Reduction
        • 5.3.1. Why Latency Is a Problem
        • 5.3.2. Our Latency Approach
      • 5.4. Beta Phase: Prototype
        • 5.4.1. System Architecture
        • 5.4.2. Routing
        • 5.4.3. Latency
      • 5.5. Stage 1: Arbitrage Pairs Trading
        • 5.5.1. System Architecture
        • 5.5.2. Routing
        • 5.5.3. Latency
      • 5.6. Stage 2: Simultaneous Short-Long Strategy
        • 5.6.1. System Architecture
        • 5.6.2. Routing
        • 5.6.3. Latency
      • 5.7. Stage 3: Arbitrage Chain Trading
        • 5.7.1. System Architecture
        • 5.7.2. Routing
        • 5.7.3. Latency
      • 5.8 Stage 4: Fully Decentralized Arbitrage Trading
        • 5.8.1 System Architecture
        • 5.8.2 Routing
        • 5.8.3 Latency
    • 6. Conclusion
    • Task Center
      • How to get a task
      • How to complete the task
      • Task Center Frequently Asked Questions
      • Task center conditions and terms of use
  • BINANCE EDUCATION
    • Account Functions
      • How to Register on Binance App
      • How to Register on Binance with Mobile Number
      • How to Register on Binance by Email
      • How to Use Binance Referral Program
      • How to Disable My Account
      • How to Unlock My Account on Binance App
      • How to Unlock an Account
      • How to Convert Small Account Balance to BNB
      • How to Manage Sub-Account Functions and Frequently Asked Questions
      • How to Reset Your Binance Account Password
      • How to Generate Binance Account Statements
    • Identity Verification
      • How to Complete Identity Verification
      • How to Apply for Corporate Account
    • Two-factor Authentication
      • How to Enable Google Authentication (2FA) and Frequently Asked Questions
      • How to Solve 2FA Code Error
      • How to Reset Google Authentication on Binance App
      • How to Reset Google Authentication
      • How to Reset SMS Authentication on Binance App
      • How to Reset SMS Authentication
      • Supported SMS countries
      • Why Can’t I Receive SMS Verification Codes
      • How to Use YubiKey for Two-factor Authentication (2FA) on Binance
      • How to delete YubiKey for Two-factor Authentication (2FA)
      • How to Enable Binance Authenticator
    • Email Issues
      • How to Change Account Email
      • Why Can’t I Receive Emails from Binance
      • How to Whitelist Binance Emails
    • Referral & Affiliates
      • How to Redeem a Futures Bonus Voucher/Cash Voucher
      • How to Redeem Savings Trial Fund
      • How to Redeem a VIP Upgrade Voucher
      • Cashback Voucher Terms and Conditions
      • How to Redeem a Cashback Voucher
      • How to Redeem a Margin 0% Interest Voucher
      • How to Redeem a Voucher Code
    • Wallets
      • How to Check Balance and Transfer Funds on Wallet Overview
      • How to Connect Binance Extension Wallet (BEW) via Wallet Direct
      • Frequently Asked Questions on Binance App Funding Wallet Migration
      • Frequently Asked Questions on P2P Wallet to Funding Wallet Migration
    • Task Center
      • How to get a task
      • How to complete the task
      • Task Center Frequently Asked Questions
      • Task center conditions and terms of use
  • Created Wallet Address
    • Metamask Wallet Address
    • Connecting MetaMask to BNB Smart Chain
    • Add BUSD token in Metamask
    • Trust Wallet Address
      • Protect Your Crypto Wallet
      • Recovery Phrase or Private Key
  • FUTURE GOLD ACADEMY
    • IDO FUTURE GOLD FGT
      • Daily Gold Farms Future Interest
      • Daily Gold Farms Fixed Interest
      • Daily Gold Farms Compound Interest
    • Telegram Chat Id
    • How To Buy FGT
Powered by GitBook
On this page
  • Installing and setting up MetaMask
  • Configuring the wallet
  • Making transactions (on the testnet)
  • Closing thoughts
  1. Created Wallet Address

Connecting MetaMask to BNB Smart Chain

PreviousMetamask Wallet AddressNextAdd BUSD token in Metamask

Last updated 1 year ago

Installing and setting up MetaMask

MetaMask can be downloaded on Chrome and Firefox, or on iOS and Android if you’re a mobile user. For the purposes of this tutorial, we’ll use the Firefox version, but the instructions will be more or less the same for every platform.

Firstly, you’ll want to head over to the MetaMask Download page. From there, select whichever platform you’re using, and follow the steps to install it on your device. Easy!

Next, follow along with the setup specified by the app. Go ahead and click Create a Wallet. Write down the backup seed phrase somewhere secret (preferably not on an Internet-connected device). Without this phrase, your funds can’t be recovered if your device is damaged or lost. Confirm that you’ve written them down on the next page.

And that’s it! You should now see your wallet, ready to send and receive funds.

The freshly-initialized MetaMask wallet.

Configuring the wallet

You might notice straight away that we’re still dealing with an Ethereum wallet. At best, this won’t work with BNB Smart Chain (BSC) DApps. At worst, you could lose funds by sending them to addresses you can’t actually use.

Let’s change that. We want to access the Settings to point the wallet towards BNB Smart Chain nodes.

On the Settings page, we want to locate the Networks menu.

We want to click Add Network in the top-right corner to manually add the BNB Smart Chain one – it doesn’t come packaged with MetaMask. It’s important to note that there are two networks we can use here: the testnet or the mainnet. Below are the parameters to fill in for each.

Mainnet (This is the one you are probably looking for)

Network Name: Smart Chain

New RPC URL: https://bsc-dataseed.binance.org/

ChainID: 56

Symbol: BNB

Block Explorer URL: https://bscscan.com

Testnet

Network Name: Smart Chain - Testnet

New RPC URL: https://data-seed-prebsc-1-s1.binance.org:8545/

ChainID: 97

Symbol: BNB

Block Explorer URL: https://testnet.bscscan.com

We’re going to use the testnet in this tutorial, but you will likely want to use the mainnet. We recommend adding both if you intend to use MetaMask to transfer BNB or BNB Smart Chain tokens.

Once you Save the Network and return to the main view, you’ll notice two things: the network has automatically been set to the one you just entered, and the units are no longer denominated in ETH, but in BNB.

Making transactions (on the testnet)

Peggy coins might be of interest if you’re testing out an application that supports BEP-20 tokens. They’re simply tokens issued on BNB Smart Chain that are “pegged” to assets on other chains (like BTC, XRP, USDT, etc.), meaning that they trade at the same price.

Let’s stick to BNB for now. Click on the Give me BNB dropdown and select the amount you wish to receive. You might need to wait a couple of minutes, but the funds will show up in your testnet wallet imminently.

We’ve gone with a transaction of 1 BNB. We’ll leave the fees untouched and hit Next. We then get one more chance to review the transaction – if everything looks good, hit Confirm. And that’s it! You’ll get a notification informing you when your transaction settles.

Closing thoughts

MetaMask has long been the go-to passport for accessing the sprawling Ethereum landscape. But, with minimal effort, anyone can configure it to point towards BNB Smart Chain. This allows them to enjoy years of development put into making MetaMask an indispensable tool for anyone interacting with decentralized applications.

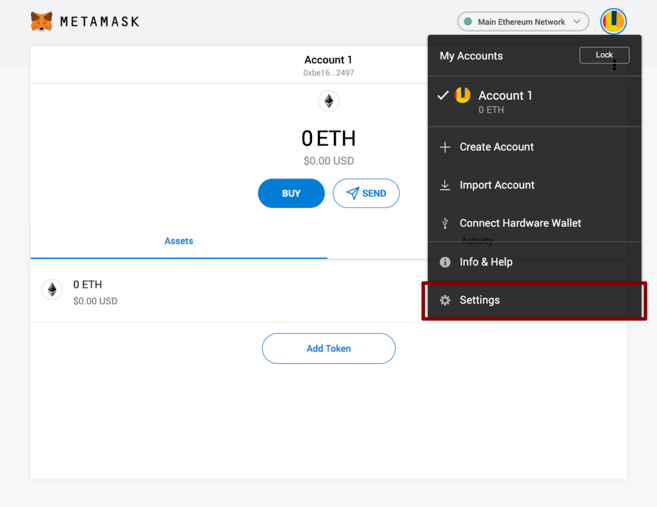
Select Settings from the dropdown menu.
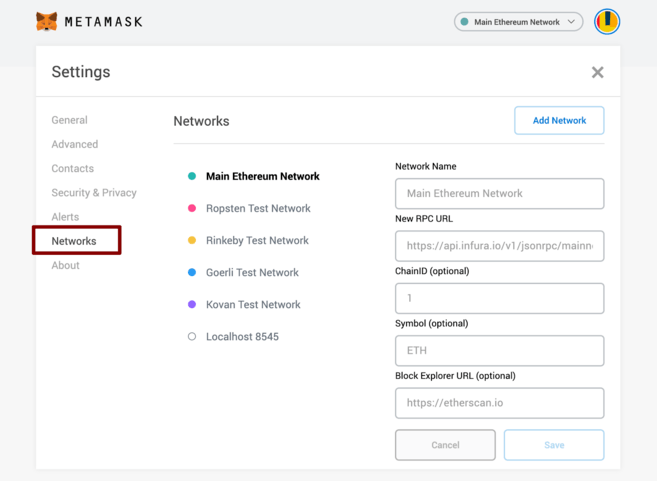
The Networks menu.
We’ve connected to the testnet, but you'll probably be connecting to the mainnet.
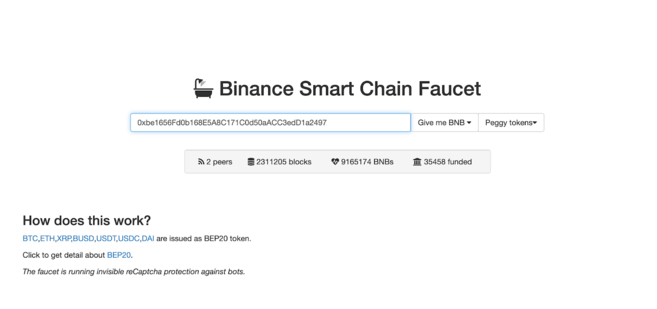
Don’t let the Ethereum logo fool you – we’ve tuned into the BSC testnet. Next, let’s get some funds to play with. Hover over Account 1, and click to copy your address to the clipboard. We’ll head over to the and paste it into the form.

Let’s get rich.
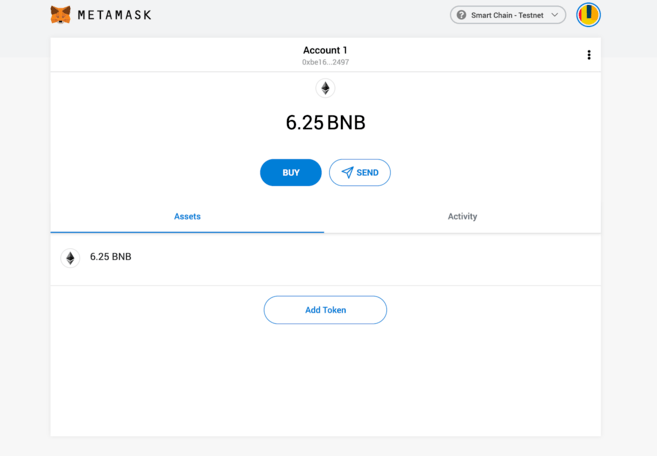
Our newly-funded wallet.

From here, we’ll send the funds off somewhere to demonstrate how it works. We’ve just grabbed a random address from that we’ll donate them to. Go ahead and click Send.

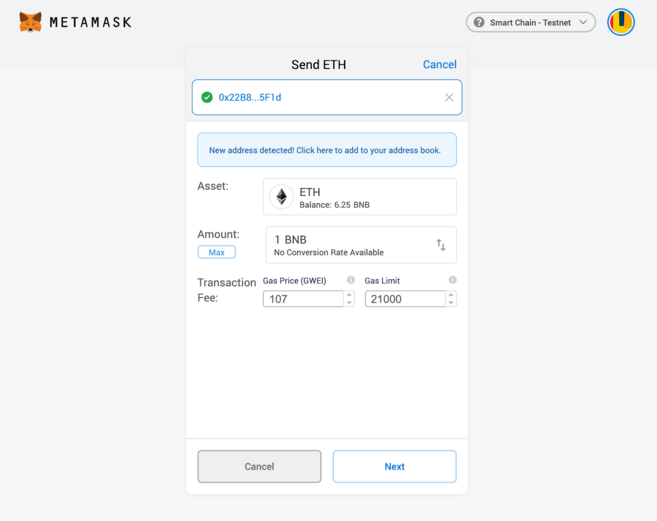
You can ignore the parts relating to ether. Here, you can manually adjust the fee if required.
BNB Smart Chain Faucet
BscScan Testnet